NetworkManager
NetworkManager allows configuration and control of VPN daemons through a plugin interface. We provide such a plugin for NetworkManager to configure roadwarrior clients for the most common setups. The plugin supports connections using the IKEv2 protocol only.
NetworkManager uses D-Bus to communicate with a special build of the charon IKE
daemon (charon-nm) which runs independently of the regular daemon (e.g.
charon-systemd) to avoid conflicts.
The plugin uses a certificate for server authentication and supports EAP and
public key authentication for client authentication (since version 5.8.3 /
NetworkManager-strongswan 1.5.0 also EAP-TLS). PSK authentication is
supported starting with version 1.3.1 of the plugin but strong secrets (a minimum
of 20 characters) are enforced.
You can use any password based EAP method supported by strongSwan (MD5/
GTC/MSCHAPv2) or public key authentication (optionally with EAP-TLS).
Private keys are either stored in a file or accessed through your ready-to-use
ssh-agent. You’ll need a certificate matching that key. Also, private keys
and certificates on a smart card can be used (see below for details).
If you configure the server certificate directly on the clients, there are no
certificate requirements. If you deploy CA certificates, the server
certificate will need a subjectAltName matching the host name of the server
(the same you enter in the client’s configuration). Since version 5.8.3 /
NetworkManager-strongswan 1.5.0 it’s possible to configure the server identity
explicitly. You can also use preinstalled root CA certificates of your distribution,
using the --with-nm-ca-dir
./configure option. Since version
5.5.1, this can also be modified with the charon-nm.ca_dir setting in
strongswan.conf. Just don’t specify
any server/CA certificate in the GUI to use preinstalled root certificates.
CA certificates on a smart card are automatically used.
Dependencies
The original strongSwan NM plugin and the NetworkManager VPN module were based on
the NetworkManager 0.9 interface. Version 1.4.0 of the plugin updated parts of it
to the NetworkManager 1.2 interface (mostly related to the GUI, the plugin in
charon-nm is largely unchanged). It should work out-of-the-box with the latest
packages of your favorite Linux distribution.
Installation
Your distribution may provide a package (e.g. network-manager-strongswan
on Debian/Ubuntu). Otherwise, you have to build strongSwan from sources.
Building from Sources
Backend
To build the strongSwan NM backend (charon-nm) from sources you need the
NetworkManager headers:
apt-get install libssl-dev libnm-dev
NM integration works only for IKEv2. Since on a desktop we have OpenSSL installed anyway, we are going to use libcrypto for all cryptographic operations.
--enable-agent builds the ssh-agent private key plugin, EAP plugins are
enabled using --enable-eap-gtc --enable-eap-md5 --enable-eap-mschapv2. For
smart card support, add --enable-pkcs11.
You may omit options you don’t need, or add additional ones (e.g. to enable
EAP-TLS or the
bypass-lan plugin).
# get the strongSwan tarball
wget https://download.strongswan.org/strongswan-5.x.x.tar.bz2
tar xf strongswan-5.x.x.tar.bz2
cd strongswan-5.x.x

# build strongSwan with OpenSSL/NM backend
./configure --sysconfdir=/etc --prefix=/usr --libexecdir=/usr/lib \
   --disable-aes --disable-des --disable-md5 --disable-sha1 --disable-sha2 \
   --disable-fips-prf --disable-gmp --enable-openssl --enable-nm --enable-agent \
   --enable-eap-gtc --enable-eap-md5 --enable-eap-mschapv2 --enable-eap-identity
make
make install
Frontend
To build the NM GUI plugin from sources you additionally need GTK and GUI utility libraries:
apt-get install libnma-dev libgtk-3-dev libsecret-1-dev intltool
To build with GTK 4 support (available since NetworkManager-strongswan 1.6.0),
additionally install libnma-gtk4-dev and libgtk-4-dev and pass
--with-gtk4 below.
# get the NetworkManager strongSwan plugin as a tarball
wget https://download.strongswan.org/NetworkManager/NetworkManager-strongswan-1.x.x.tar.bz2
tar xf NetworkManager-strongswan-1.x.x.tar.bz2
cd NetworkManager-strongswan-1.x.x

# build the NetworkManager strongSwan plugin
# (if you changed prefix/libexecdir above, set --with-charon=/path/to/charon-nm)
./configure --sysconfdir=/etc --prefix=/usr
make
make install
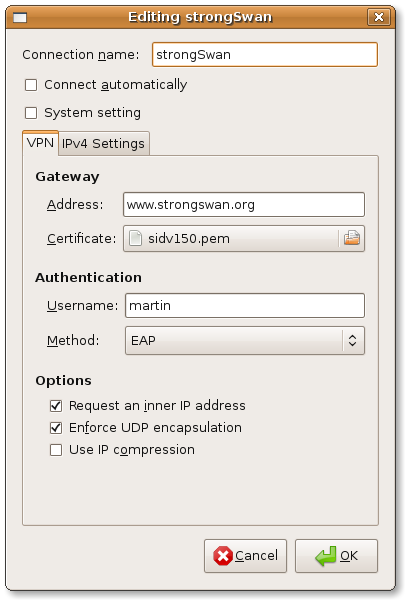
Configuration
-
Open the Network area in GNOME Settings (
gnome-control-center), or click on the NM-applet → Edit Connections… or VPN Connections → Configure VPN… in older releases -
Add VPN → IPsec/IKEv2 (strongswan) → Create…
-
Configure your client
-
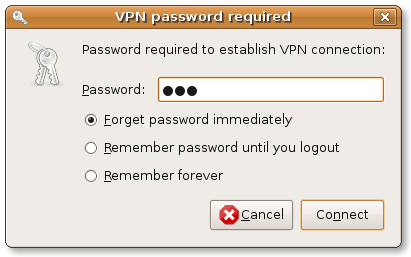
Enable the VPN connection via GNOME Settings or status area (or click on NM-applet → VPN Connections → Your Connection in older releases)
-
Enter password if necessary
As you can see there is no subnet configuration for the tunnel. We let the server
administration choose the subnet(s); the client always proposes 0.0.0.0/0,::/0
as remote traffic selector and the server narrows that down to the
configured subnet(s).
If you use public key-based authentication, please store your certificate and private key in separate files.
Many of the global charon-specific configuration
options in strongswan.conf also apply to
charon-nm. However, options set in the charon section are
not inherited by charon-nm. So make sure to set settings in the
charon-nm section.
The following options are specific to charon-nm:
| Key | Default | Description |
|---|---|---|
ca_dir |
[→] |
Directory from which to load CA certificates if no certificate is configured.
|
mtu |
|
MTU for XFRM interfaces created by the NM plugin |
Logging for charon-nm is configured via syslog by default. On systems
with systemd, log messages can be viewed with journalctl -u NetworkManager
because charon-nm is controlled by NetworkManager.
| Key | Default | Description |
|---|---|---|
charon-nm.syslog.daemon |
||
default |
|
Default to logging via syslog’s daemon facility on level 1. |
Due to its primary purpose for roadwarrior connections, its interaction with
NetworkManager, and its use of XFRM interfaces, charon-nm sets very specific
default values for several global options. It’s usually not necessary to change
them, but they may in case of conflicts.
| Key | Default | Description |
|---|---|---|
charon-nm |
||
install_virtual_ip_on |
|
Interface on which virtual IP addresses are installed. Note that NM also installs the virtual IPs on the XFRM interface. However, that happens later than required to install routes. |
port |
|
Source port when sending packets to port 500. Defaults to an ephemeral
port. May be set to |
port_nat_t |
|
Source port when sending packets to port 4500 or a custom server port.
Defaults to an ephemeral port. May be set to e.g. |
retransmit_base |
|
Base to use for calculating exponential back off, see
Retransmission. Default retransmission
settings for |
retransmit_timeout |
|
Timeout in seconds before sending first retransmit |
retransmit_tries |
|
Number of times to retransmit a packet before giving up. |
routing_table |
|
Table where routes via XFRM interface are installed. Should be different than the table used for the regular IKE daemon due to the mark (see below). |
routing_table_prio |
|
Priority of the routing table. Higher than the default priority used for the regular IKE daemon. |
charon-nm.plugins.kernel-netlink |
||
fwmark |
|
Make packets with this mark ignore the routing table. Must be the same mark
set in |
charon-nm.plugins.socket-default |
||
fwmark |
|
Mark applied to IKE and ESP packets to ignore the routing table and avoid routing loops when using XFRM interfaces. |
Smart Card Requirements
The use of smart cards should be as simple as possible to the end user, which brings some restrictions. For instance, the daemon automatically selects the first certificate with a private key on any token in any slot.
First, you’ll need to specify the PKCS#11 module in
strongswan.conf. Please refer to the
smart card support information for details on how to do so
(use the charon-nm section to only load modules in the NM backend).
You may define multiple modules, the daemon looks for the first certificate/private key in the specified module order.
The daemon uses the following mechanism to find a private key:
-
Enumerate all certificates which have the
TLS Client Auth Extended Keyusage, but no CA constraint -
For each certificate:
-
Extract the
subjectKeyIdentifier -
Enumerate all modules with all tokens
-
For each token:
-
Look for a public key having the certificate’s subjectKeyIdentifier as ID
-
If not found, enumerate all public keys and look for a certificate with a matching subjectKeyIdentifier and use its ID
-
If found, log in to the smart card using the supplied PIN
-
If logged in, load the associated private key
-
-
-
In short the private key on the token must have a public key readable without
login and both objects must have a matching ID. Before version 5.5.1 both objects
had to have an ID matching the certificate’s subjectKeyIdentifier
(or the hash of the subjectPublicKey field of the public key). The certificate
needs the TLS CLient Auth Extended Key usage flag.
The daemon uses the first subjectAltName of the selected certificate as IKEv2
identity or uses the full DN if none is found. Since
version 5.8.3 / NetworkManager-strongswan 1.5.0 the client identity may also be
configured explicitly.
Server Configuration
Depending on the used authentication methods, you can use server configurations
very similar to those for
Windows clients (based
on certificates or MSCHAPv2) or e.g. use eap-gtc and
xauth-pam to authenticate against PAM.